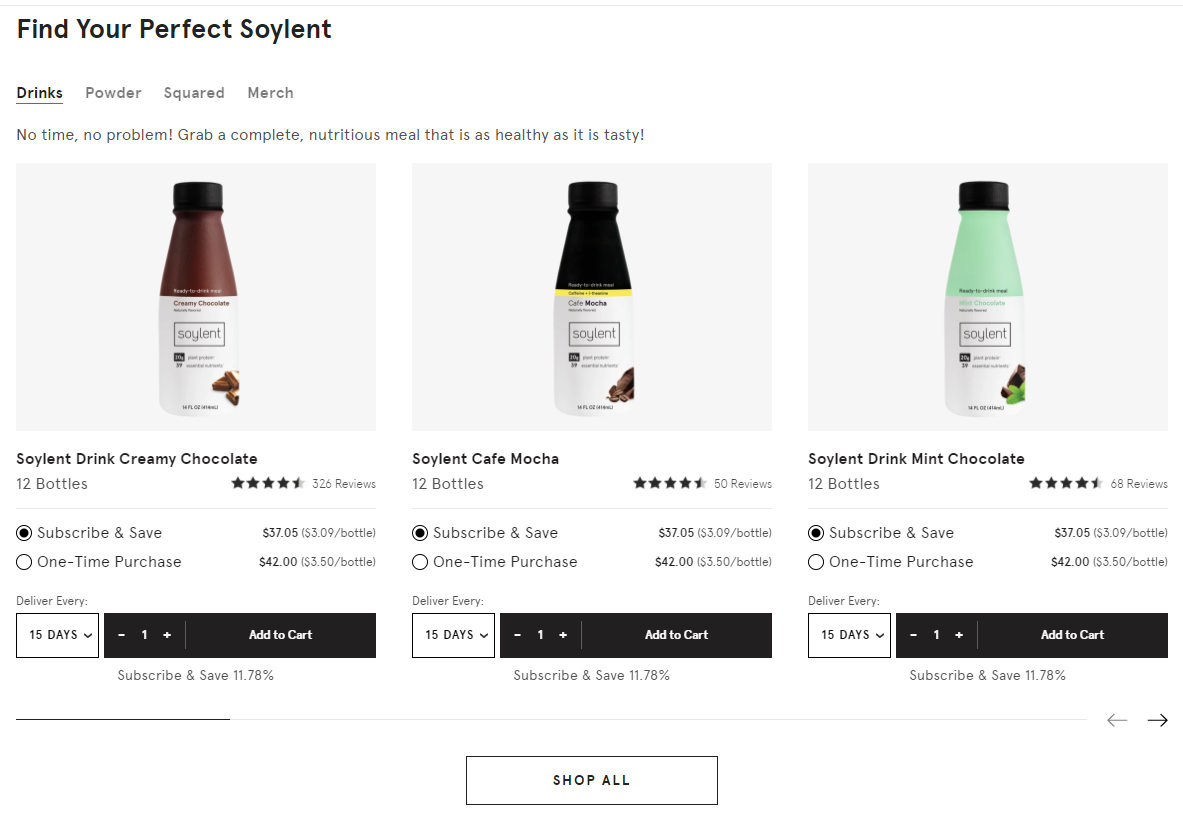
clone 내용
파악하기
-
구현된 목록
- 4가지 탭을 선택할 수 있다
- 탭마다 다른 문구와 슬라이드가 보여진다
-
슬라이드는 3개씩 보여진다
-
구현해볼 목록
- 페이지 네이션이 있으며 자체 클릭이 가능하다
- 페이지 버튼이 있으며 max 로 가면 클릭 불가 상태가 된다
- 라디오 버튼 모양 만들기
- 라디오 버튼 클릭시 하단의 표시내용 변경
- 날짜 텀 드롭다운으로 선택 가능하게
- + - 버튼, 숫자 5까지 선택 가능
- (클릭 + 드레그)로 슬라이드 넘기기 기능
구조 만들기
- radiobox
- radios(정규 구독 구매)
- radios(한번만 구매)
- radios(정규 구독 구매)
- input type radio
- 라벨, 가격
- quantity
- quantity
- select-box
- (구독 텀)duration
- count-box
- +,- 버튼
- add cart 버튼
- select-box
- radios(한번만 구매)
- input type radio
- 라벨, 가격
- quantity
- quantity
- select-box
- count-box
- +,- 버튼
- add cart 버튼
- count-box
- select-box
주의 사항
- 라디오 박스 넘버링
-
[슬라이드 박스 번호][페이지 번호][슬라이드 번호(누적)] - +, - 구현
1
2
3
4
5
6
7
<div class="number">
  <button class="mi"
    onclick="this.parentNode.querySelector('input[type=number]').stepDown()">-</button>
  <button class="pl"
    onclick="this.parentNode.querySelector('input[type=number]').stepUp()">+</button>
  <input type="number" name="num" value="1" step="1" min="1" max="5">
</div>
스타일 만들기
라디오 박스 체크 모양
- 라디오박스 체크모양 변경
- 라벨 앞에 요소를 만들어 준다
- 체크 되었을 때의 모양을 만들어 준다
- 두 요소의 위치를 맞추어 준다
- 결과 동그라미 안의 동그라미가 완성
1
2
3
4
5
6
7
8
9
10
11
12
13
14
15
16
17
18
19
20
21
22
23
24
25
26
27
28
29
30
31
.radiobox input,
.radiobox input:checked{
  appearance: none;
  position: absolute;
}
.radiobox .radios label{
  position: absolute;
  top: -5px;
  left: 6px;
  font-size: 18px;
}
.radiobox .radios label::before{
  content: '';
  display: inline-block;
  width: 18px;
  height: 18px;
  border: 1px solid #181A19;
  border-radius: 100%;
  position: relative;
  left: -4px;
  top: 3px;
}
.radiobox input:checked{
  width: 12px;
  height: 12px;
  border-radius: 100%;
  background: #181A19;
  position: absolute;
  top: -1px;
  left: 1px;
}
선택에 따른 보여지는 내용 변경
- 라디오 박스 선택에 따라
- 구독형, 비구독형을 보여줌
- visual 클래스로 관리
1
2
3
4
5
6
7
8
9
10
11
12
13
14
15
.radios .quantity{
  display: none;
}
.radios .quantity2{
  display: none;
}
.radios .quantity.visual{
  display: flex;
  position: absolute;
  flex-direction: column;
  width: 100%;
  top: 75px;
  left: 0px;
}
/* quantitiy2 설정은 여기선 생략 */
select 태그 초기화
1
2
3
4
5
6
7
8
9
10
11
12
13
.select-box .terms select{
  -moz-appearance: none;
  -webkit-appearance: none;
  appearance: none;
  display: inline-block;
  padding: 16px 21px 15px 14px;
  font-family: inherit;
  font-size: 13px;
  font-weight: 700;
  letter-spacing: 1.5px;
  background-color: transparent;
  border: 1.5px solid #181A19;
}
input 태그 초기화
1
2
3
4
5
6
7
8
9
10
11
12
13
14
15
16
.select-box .count-box .number input[type="number"] {
  -webkit-appearance: textfield;
  -moz-appearance: textfield;
  appearance: textfield;
  display: block;
  font-family: inherit;
  font-size: 13px;
  font-weight: 700;
  text-align: center;
  width: 30px;
  height: 20px;
  color: #fff;
  background-color: transparent;
  border:none;
  box-shadow:none;
}
Javascript
- 반복문을 활요한 슬라이드 라디오 버튼에 따른 폼 변경
- 각각의 라디오 박스는 독립적인 name을 가지고 있기 때문에
각각의 요소에 반응하여야 한다
1
2
3
4
5
6
7
8
9
10
11
12
13
14
15
16
17
18
19
20
21
22
23
for(let s=1; s < slideboxELs.length; s++){
  let pages = document.querySelectorAll(`.sliderbox${s} .page`);
  let slides = 0;
  let a = 0;
  for (let p=1; p <= pages.length; p++){
    slides += (pages[p-1].childElementCount);
    for (let i = 1 + a; i <= slides; i++){
      let radiobox = document.querySelector(`.radiobox${s}${p}${i}`);
      let subarea = document.querySelector(`.radiobox${s}${p}${i} .quantity`);
      let oncearea = document.querySelector(`.radiobox${s}${p}${i} .quantity2`);
      radiobox.addEventListener('click', function (){
        if (document.querySelector(`.radiobox${s}${p}${i} input[name="${s}${p}${i}"]:checked`).value == 'once'){
          subarea.classList.remove('visual');
          oncearea.classList.add('visual');
        } else {
          oncearea.classList.remove('visual');
          subarea.classList.add('visual');
        }
      });
    };
    a = slides
  };
}
느낀점
- js를 더 원활하게 다룰 수 있다면
js쪽에서 html 요소를 만들게 만드는게 맞다고 생각했다 - 일단은 구사 가능한 기술로 구현해보았다
- html에서의 작성이 매우 복잡하고 많아졌다
- 각 요소를 일일이 만들어 주어야하고 넘버링도 해야하기 때문
